Learn Webiny Next.js App
In this lesson, you'll build a real Next.js application that fetches and displays products from your Webiny Headless CMS.
In this lesson...
Here are the topics we'll cover
Create and secure API keys.
Build a reusable API client.
Fetch data using Static Site Generation (SSG).
What you'll build:
A product listing homepage that fetches products from Webiny at build time and displays them as a simple list.
Prerequisites:
- Completed Lessons 1-7 (especially Lesson 7: Reading Records via the API)
- At least 2-3 published products in your Webiny CMS
- Node.js 18+ and npm/yarn installed
- Basic understanding of React and Next.js
Introduction
So far, you've learned how to use the API Playground to query your Webiny Headless CMS. Now it's time to put that knowledge into practice by building a real Next.js application!
In this lesson, we'll create a simple product listing page that fetches data from Webiny's Read API using Static Site Generation (SSG). This means:
- Products are fetched once during build time
- The result is embedded into static HTML
- Users get instant page loads with no API calls
- Perfect for product catalogs that don't change every second
This lesson establishes the foundation for the next lessons where we'll add a contact form (Lesson 9), implement lifecycle events (Lesson 10), and more!
We'll be building on this same Next.js application throughout lessons 8-12, so each lesson adds new functionality to the same codebase.
Project Setup
First, let's set up the Next.js project.
Step 1: Clone the Starter Repository
Clone the starter repository and install dependencies:
Step 2: Explore the Project Structure
The starter project has a basic Next.js 16 setup with TypeScript and Tailwind CSS:
Step 3: Run the Development Server
Start the dev server to confirm everything works:
Open http://localhost:3000 in your browser. You should see a simple page with "Our Products" heading - that's your starting point!
Keep the dev server running while you work. It will auto-reload when you make changes.
Finding Your API URL
Before we can connect to Webiny, we need to find the API URL.
Open a terminal in your Webiny project directory (not the Next.js app) and run:
You'll see output similar to this:
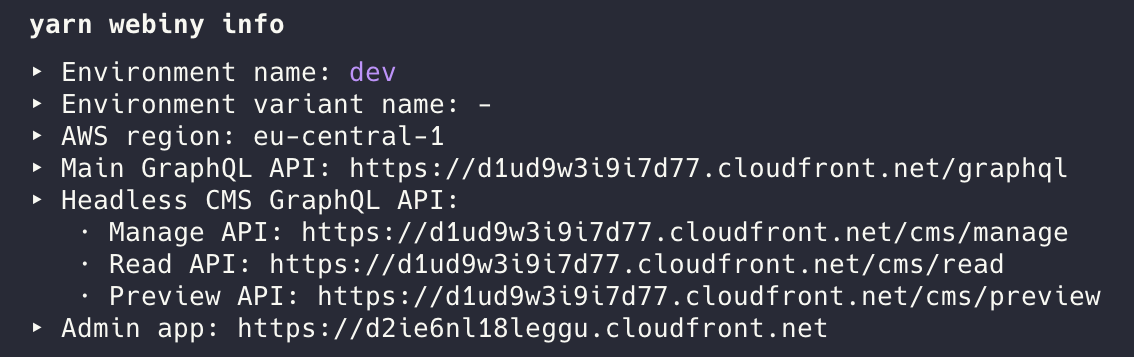
Look for the Headless CMS - Read API URL in the output. It will look something like:
Copy this URL - you'll need it in the next step.
We covered this in Lesson 5, but here's a quick reminder: The Read API only returns published content, which is perfect for a public product listing page.
Creating an API Key
Now let's create an API key that allows the Next.js app to access your Webiny CMS.
Step 1: Navigate to API Keys
- Open the Webiny Admin in your browser
- Click Settings in the left sidebar
- Click API Keys
Step 2: Create a New API Key
Click the New API Key button in the top right.
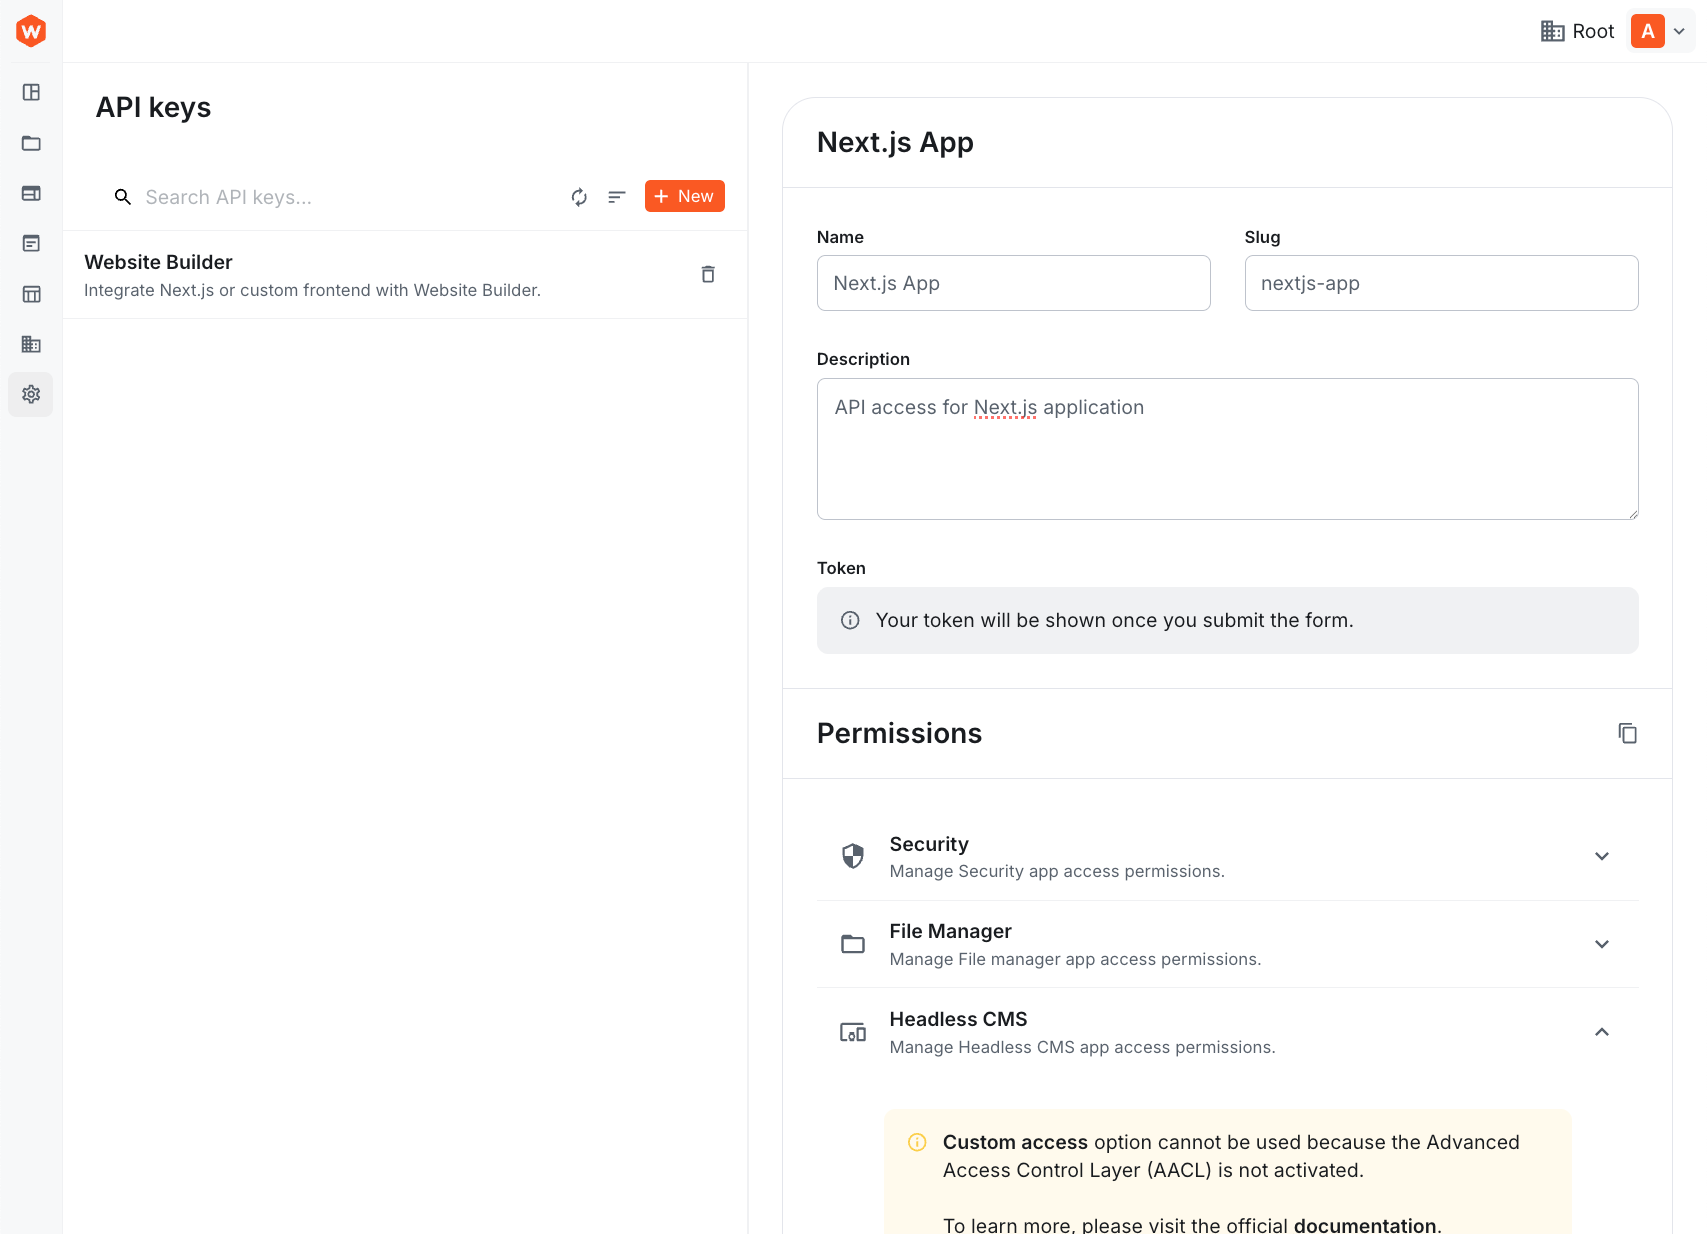
Step 3: Configure the API Key
Fill in the following details:
- Name:
Next.js App - Description:
API access for Next.js application - Permissions: Click on Headless CMS to expand the section
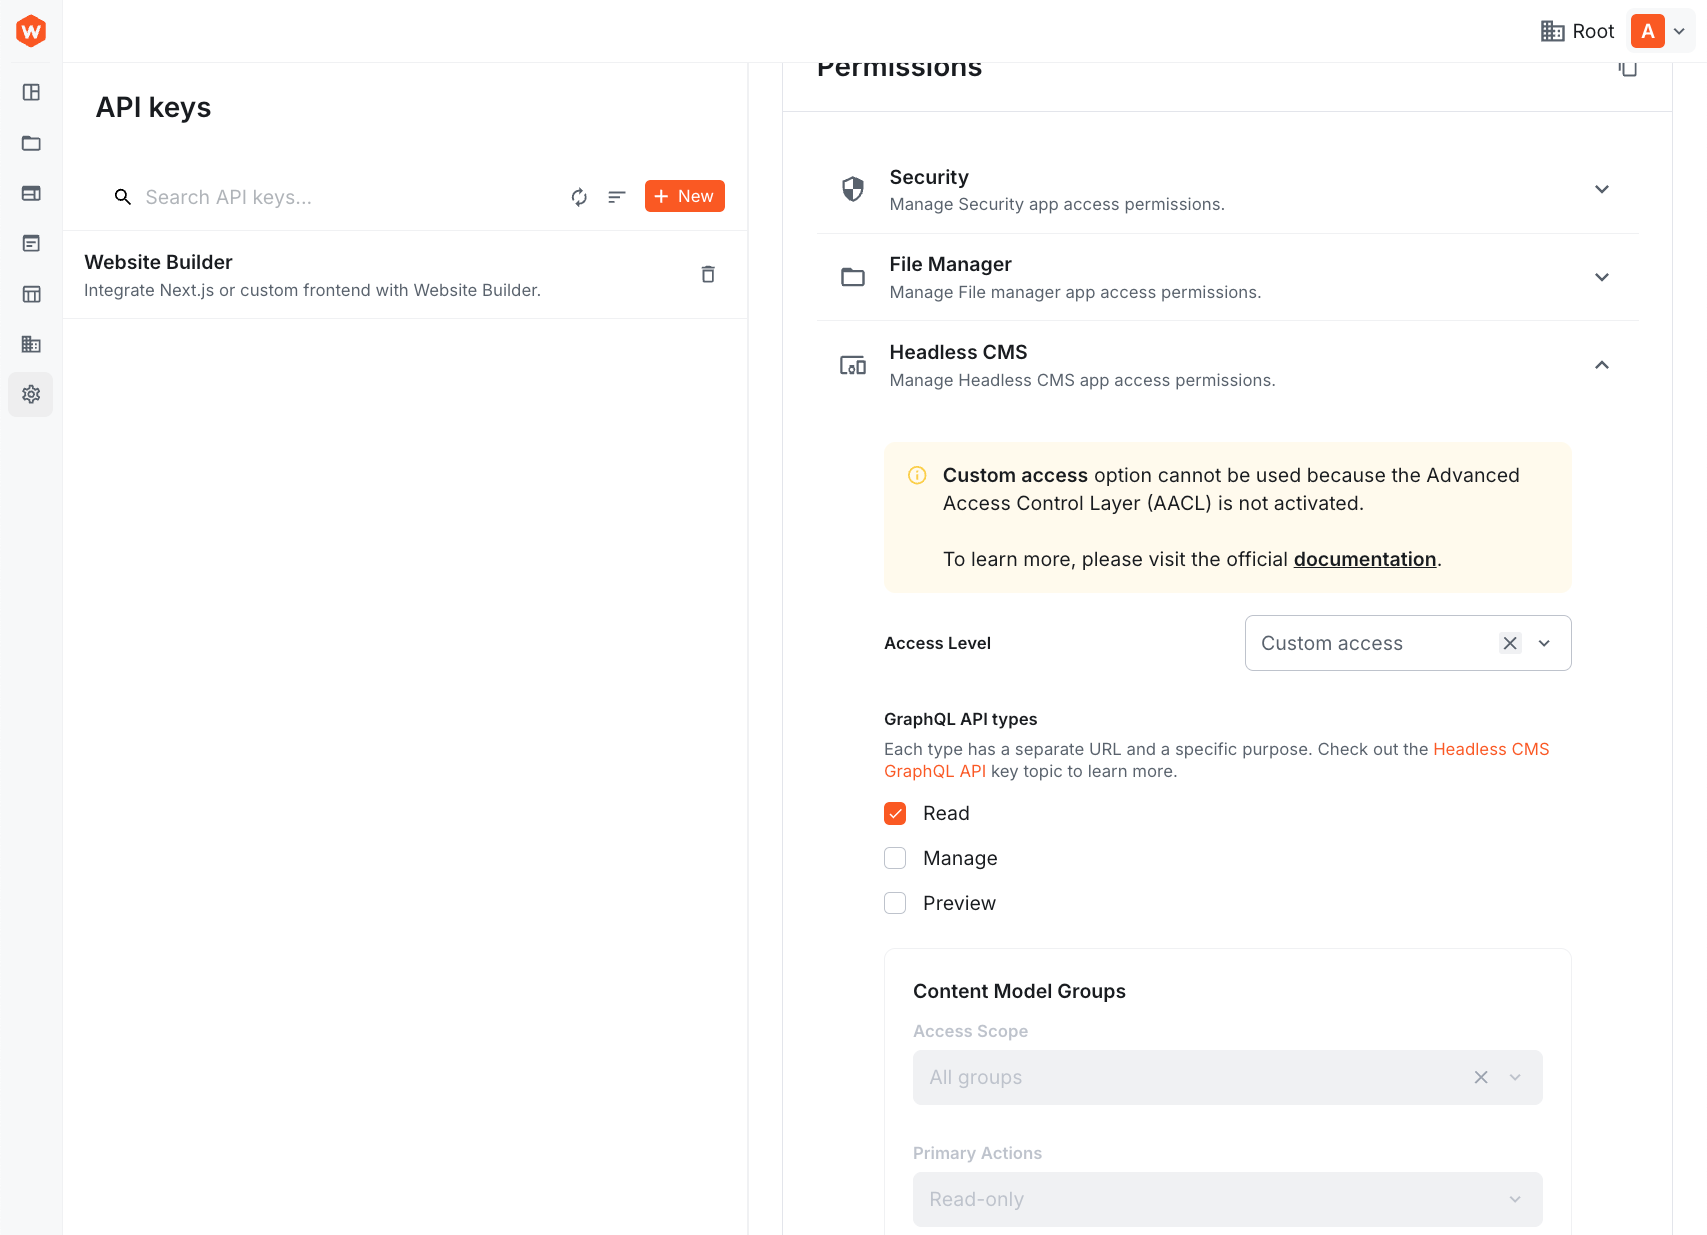
Step 4: Set Permissions
Configure the permissions as follows:
- Access Level: Select Custom access
- GraphQL API Types:
- ✅ Read (checked)
- ❌ Preview (unchecked)
- ❌ Manage (unchecked)
We're giving the API key access to only the Read API because that's all we need for displaying published products. This follows the principle of least privilege - only grant the permissions you actually need. In Lesson 9, we'll expand this API key's permissions to include the Manage API for writing data.
Note: Advanced permissions like "Content Model Groups", "Content Models", and "Primary Actions" are only available with the Advanced Access Control Layer (AACL), which requires a Business plan or higher. With the open-source version of Webiny, selecting "Read" API access gives full read access to all content.
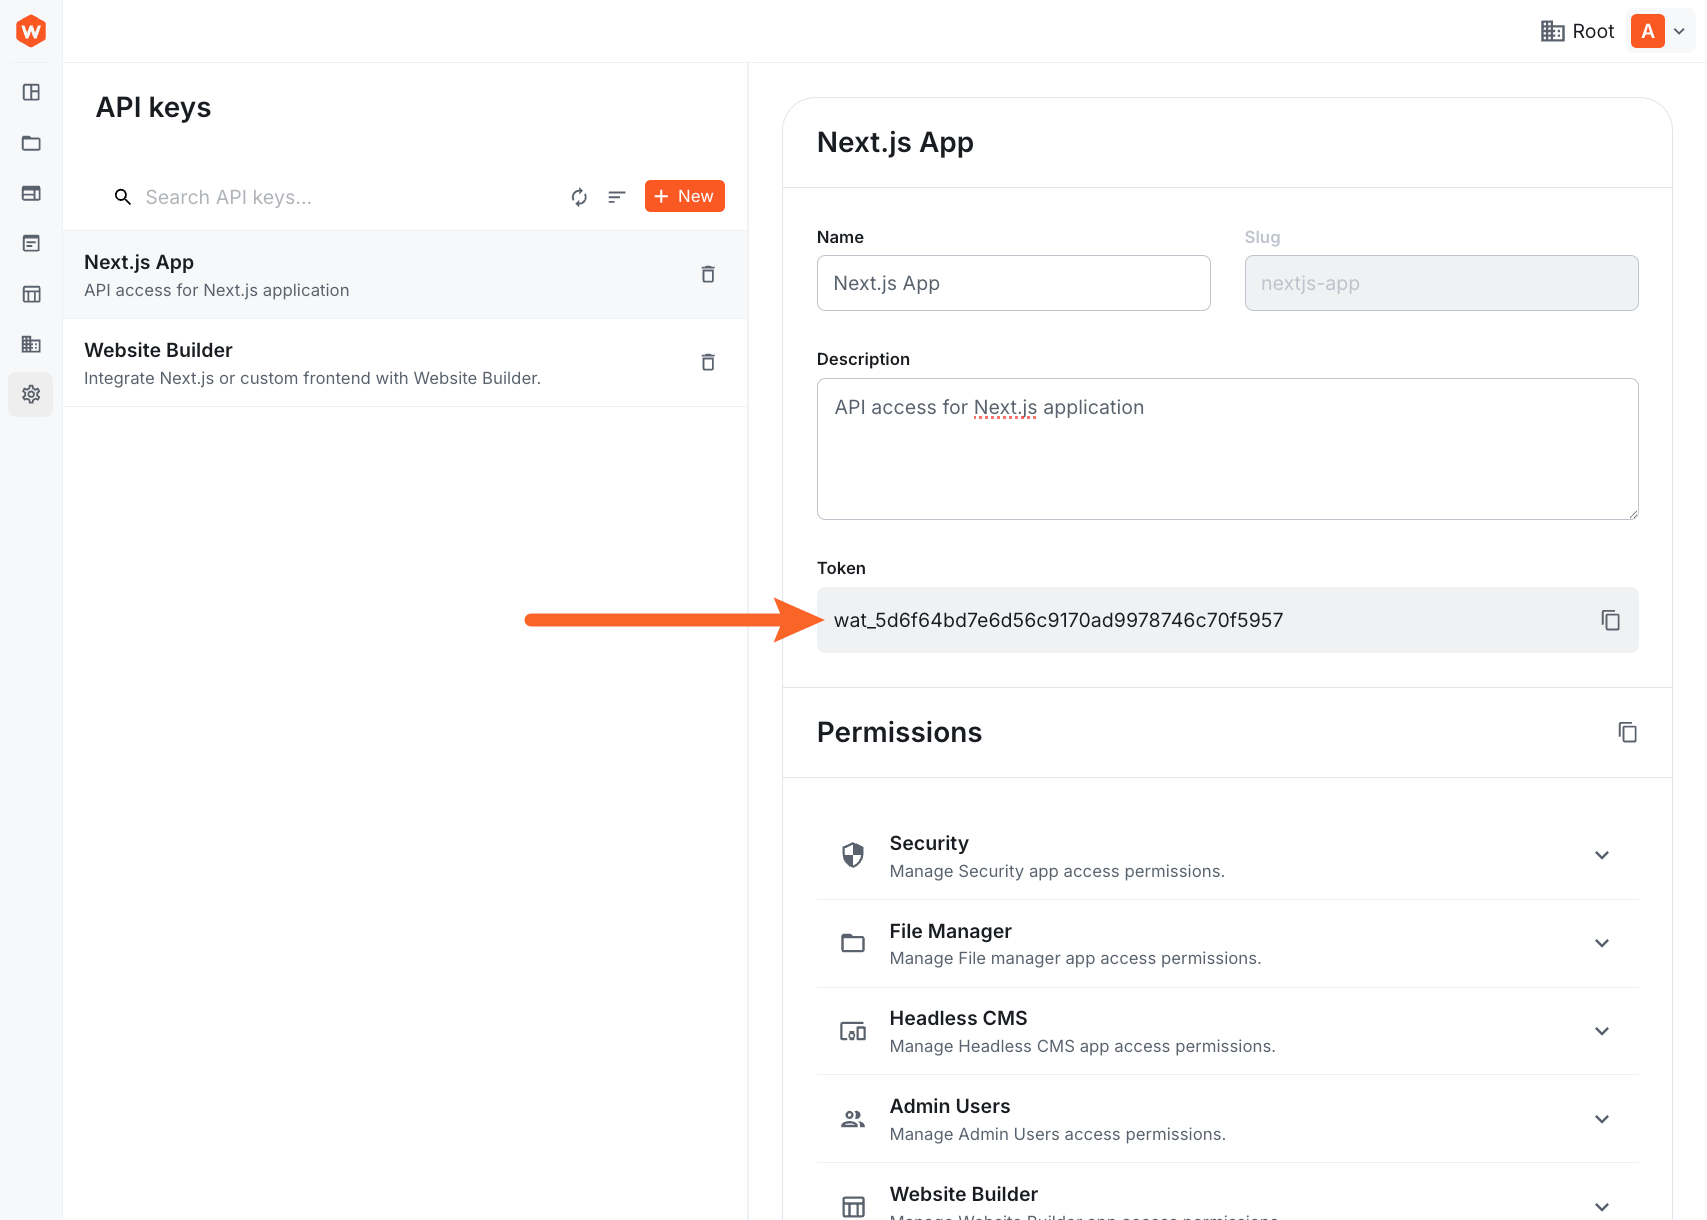
Step 5: Save and Copy the Token
- Click Save API Key
- The form will be saved and your API Token will be displayed in the Token field
- Copy the token by clicking the copy icon - you'll need it in the next step!
Keep your API token secure! Anyone with this token can access your Webiny CMS data according to the permissions you've set.
Setting Up Environment Variables
Now let's store the API URL and token securely.
Step 1: Create .env.local
In your Next.js project (not the Webiny project), create a new file called .env.local in the root directory:
Replace:
your-api-token-herewith the token you copied in the previous stephttps://your-url.cloudfront.net/cms/readwith your actual Read API URL
Step 2: Restart the Dev Server
Environment variables are only loaded when the dev server starts, so you need to restart it:
- Stop the dev server (Ctrl+C or Cmd+C)
- Start it again:
npm run dev
Never commit .env.local to version control! It's already included in .gitignore by default,
but always double-check before committing. API tokens should remain secret.
Creating TypeScript Types
Let's create TypeScript interfaces for the data we'll be working with.
Create a new file lib/types.ts:
These interfaces match the structure of data returned by Webiny's Read API. Notice how:
- User-defined fields are inside the
valuesobject - System fields like
idandentryIdare at the top level - We have an
errorfield (best practice from Lesson 6!) - We have separate interfaces for list responses and single-item responses
Creating the API Client
Now let's create a reusable API client for communicating with Webiny.
Create a new file lib/webiny.ts:
Let's break down what this code does:
- Environment Variables: Loads the API URL and token from
.env.local - Error Checking: Throws an error if environment variables are missing
- fetchWebiny Function: Generic function that:
- Makes a POST request to Webiny
- Adds authentication headers
- Handles HTTP errors
- Handles GraphQL-level errors (syntax, validation)
- Returns typed data
- getProducts Function:
- Defines the GraphQL query with
/* GraphQL */comment for syntax highlighting - Same query we used in Lesson 7!
- Calls
fetchWebinywith proper types - Handles Webiny-level errors (from the
errorfield) - Returns array of products
- Defines the GraphQL query with
Remember from Lesson 7: There are two types of errors: - GraphQL errors (top-level errors
array) - syntax/validation issues - Webiny errors (inside error field) - business logic
issues Our API client handles both!
Fetching Data in the Homepage
Now let's use our API client to fetch products and display them!
Update app/page.tsx:
Let's understand what's happening here:
- Async Server Component: The component is
async, which allows us to useawaitdirectly - Fetch Products: We call
getProducts()from our API client - Error Handling: We wrap the fetch in a try/catch to handle any errors gracefully
- Conditional Rendering:
- Show error message if fetch failed
- Show "no products" message if the array is empty
- Show product list if we have products
- Product Display: For each product we show:
- Name (heading)
- Price (formatted with dollar sign)
- Description
- SKU (small text)
This is a Server Component, which means it runs on the server (or at build time). The Webiny API is called during the build process, not in the browser!
Testing in Development
Save all your files and check your browser at http://localhost:3000.
You should see your products displayed! If you don't see products or see an error, check the troubleshooting section below.
Building for Production
Now let's see SSG (Static Site Generation) in action!
Step 1: Build the Application
Run the build command:
You should see output similar to this:
The ○ (Static) indicator means the page was statically generated at build time. This is exactly what we want!
Step 2: Start the Production Server
Step 3: Test the Production Build
Open http://localhost:3000 again. The page should load instantly because it's serving pre-built HTML with embedded product data!
In production, the Webiny API is called only once during npm run build. Users get instant page
loads because the HTML is already generated with all product data included.
How Static Site Generation Works
Let's understand what just happened:
-
Build Time: When you ran
npm run build:- Next.js executed your Server Component
- The
getProducts()function called Webiny's Read API - Products were fetched from your CMS
- The response was embedded into static HTML
- HTML was saved to disk
-
Request Time: When a user visits the page:
- Next.js serves the pre-built HTML immediately
- No API calls to Webiny happen
- Page loads instantly (no loading spinners!)
- Users see the product data from build time
-
Updating Content:
- If you publish new products in Webiny, they won't appear immediately
- You need to rebuild the app:
npm run build - Or use Incremental Static Regeneration (ISR) - covered in advanced topics
Why use SSG for a product catalog?
- ✅ Performance: Instant page loads
- ✅ SEO: Content is in HTML for search engines
- ✅ Reliability: Works even if Webiny API is temporarily down
- ✅ Cost: Fewer API calls = lower bandwidth costs
- ⚠️ Tradeoff: Content is slightly stale (not real-time)
For most product catalogs, having content that's a few minutes or hours old is perfectly acceptable!
Troubleshooting
"Missing required environment variables" Error
Problem: The app crashes with an error about missing environment variables.
Solution:
- Verify
.env.localexists in your project root (not in a subdirectory) - Check that both
WEBINY_READ_API_URLandWEBINY_API_TOKENare set - Restart your dev server:
Ctrl+Cthennpm run dev
"Unauthorized" or "403 Forbidden" Error
Problem: API returns an authentication error.
Solution:
- Check your API token is copied correctly in
.env.local - Verify the API key has Read API permission enabled
- Make sure you're using the Read API URL (ends with
/cms/read) - Try creating a new API key and updating
.env.local
"No products found" Message
Problem: The page loads but shows "No products found".
Solution:
- Verify you have products published in Webiny (not just saved as drafts)
- Check you're using the Read API (only returns published content)
- Verify your API key has permission to access the Product model
- Test the query in the API Playground (Lesson 6) to confirm it works
GraphQL Syntax Error
Problem: Error message about GraphQL syntax.
Solution:
- Check for typos in your GraphQL query in
lib/webiny.ts - Make sure field names match your Product model exactly
- Copy the query from Lesson 7's API Playground where it worked
Build Fails
Problem: npm run build fails with an error.
Solution:
- Verify your API URL and token are correct
- Check your internet connection (build needs to reach Webiny API)
- Look at the error message - it will tell you what failed
- Test in development mode first (
npm run dev)
Summary
Congratulations! You've built a real Next.js application that fetches and displays content from Webiny Headless CMS!
In this lesson, you learned how to:
- ✅ Create API keys with specific permissions (Read-only access)
- ✅ Securely store API credentials using environment variables
- ✅ Write a reusable API client with proper error handling
- ✅ Create TypeScript types for Webiny data structures
- ✅ Fetch data from Webiny in Next.js Server Components
- ✅ Use Static Site Generation (SSG) for optimal performance
- ✅ Display CMS content with proper error handling
- ✅ Understand the difference between build-time and request-time execution
What's Next?
In the next lesson (Writing Data), we'll add a contact form to this application and learn how to write data back to Webiny using mutations. You'll create a new ContactSubmission content model and use the Manage API to save form submissions!
Want to see the complete code? Check out the completed example
repository on the completed
branch.
It's time to take a quiz!
Test your knowledge and see what you've just learned.
When using Static Site Generation (SSG), when is the Webiny API called to fetch products?
Next lesson: Writing Data - Create a contact form and learn how to write data to Webiny using mutations.