Webiny API Playground
In this lesson, you'll learn about the Webiny API Playground - an interactive GraphQL IDE that allows you to explore and test your Headless CMS APIs without writing any frontend code.
In this lesson...
Here are the topics we'll cover
Explore the API Playground interface and schema.
Write and execute GraphQL queries and mutations.
Work with Read, Preview, and Manage APIs.
Prerequisites:
- Completed Lesson 3 (Creating a Content Model via UI)
- Completed Lesson 4 (Creating a Content Model via Code)
- Completed Lesson 5 (Understanding Different HCMS APIs)
What is the API Playground?
The Webiny API Playground is a built-in GraphQL IDE (Integrated Development Environment) that comes with every Webiny project. It's based on GraphQL Playground, a popular tool for exploring and testing GraphQL APIs.
The API Playground allows you to:
- Explore your API schema - See all available queries, mutations, and types
- Test queries and mutations - Execute GraphQL operations in real-time
- View documentation - Access auto-generated docs for all API operations
- Debug responses - See exactly what data your API returns
- Experiment safely - Try out queries before implementing them in your app
Accessing the API Playground
The API Playground is accessed directly from the Webiny Admin application.
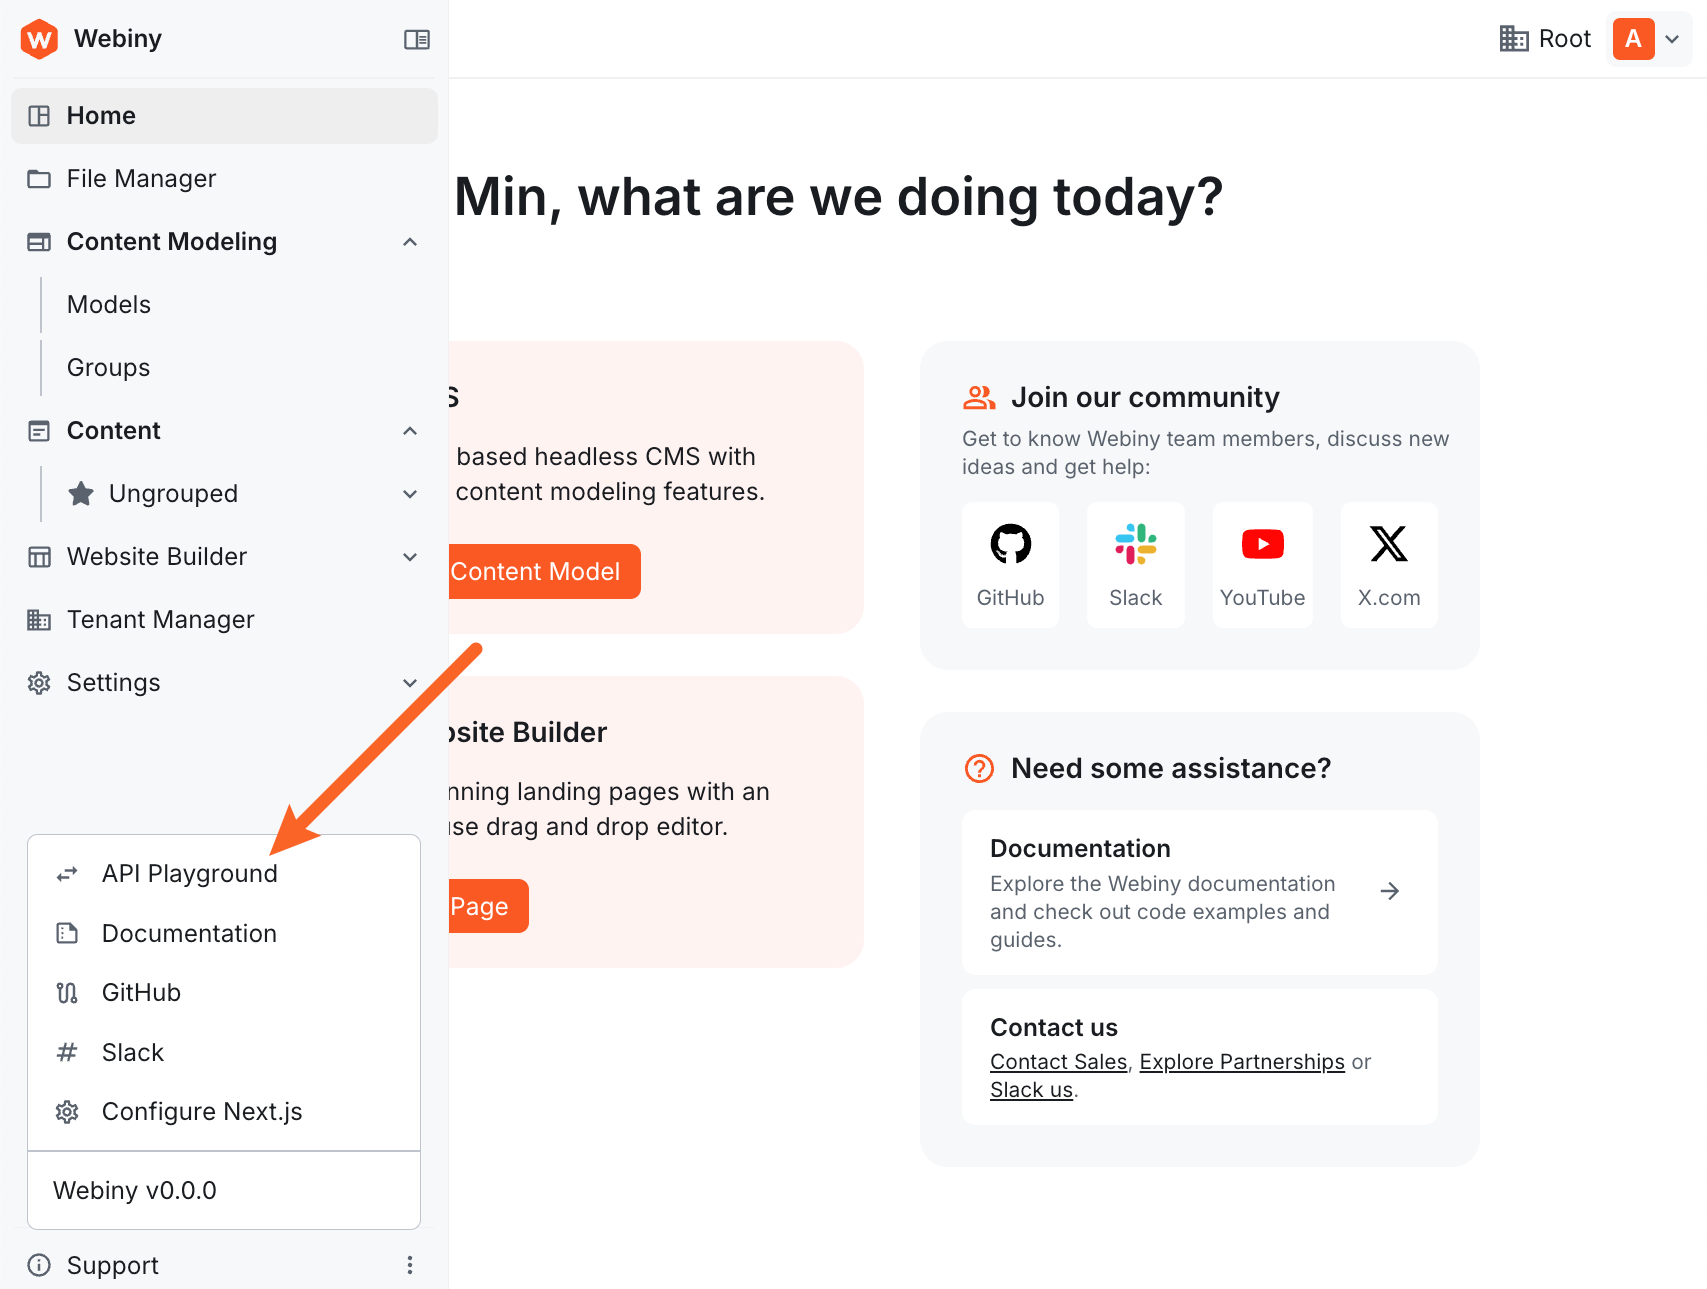
How to Open the API Playground
- Open the Webiny Admin application in your browser
- Click the Support icon (ℹ️) at the bottom of the left sidebar
- Click on API Playground from the menu that appears
- You'll see tabs for different APIs at the top:
- Main API - Core Webiny GraphQL API
- Headless CMS - Manage API
- Headless CMS - Read API
- Headless CMS - Preview API
The API Playground provides access to all three Headless CMS APIs: Manage API, Read API, and Preview API. Each has its own tab and serves different purposes. If you need a refresher on what each API does, review Lesson 5: Understanding Different HCMS APIs.
Understanding the Playground Interface
The API Playground interface has five main areas, each serving a specific purpose:
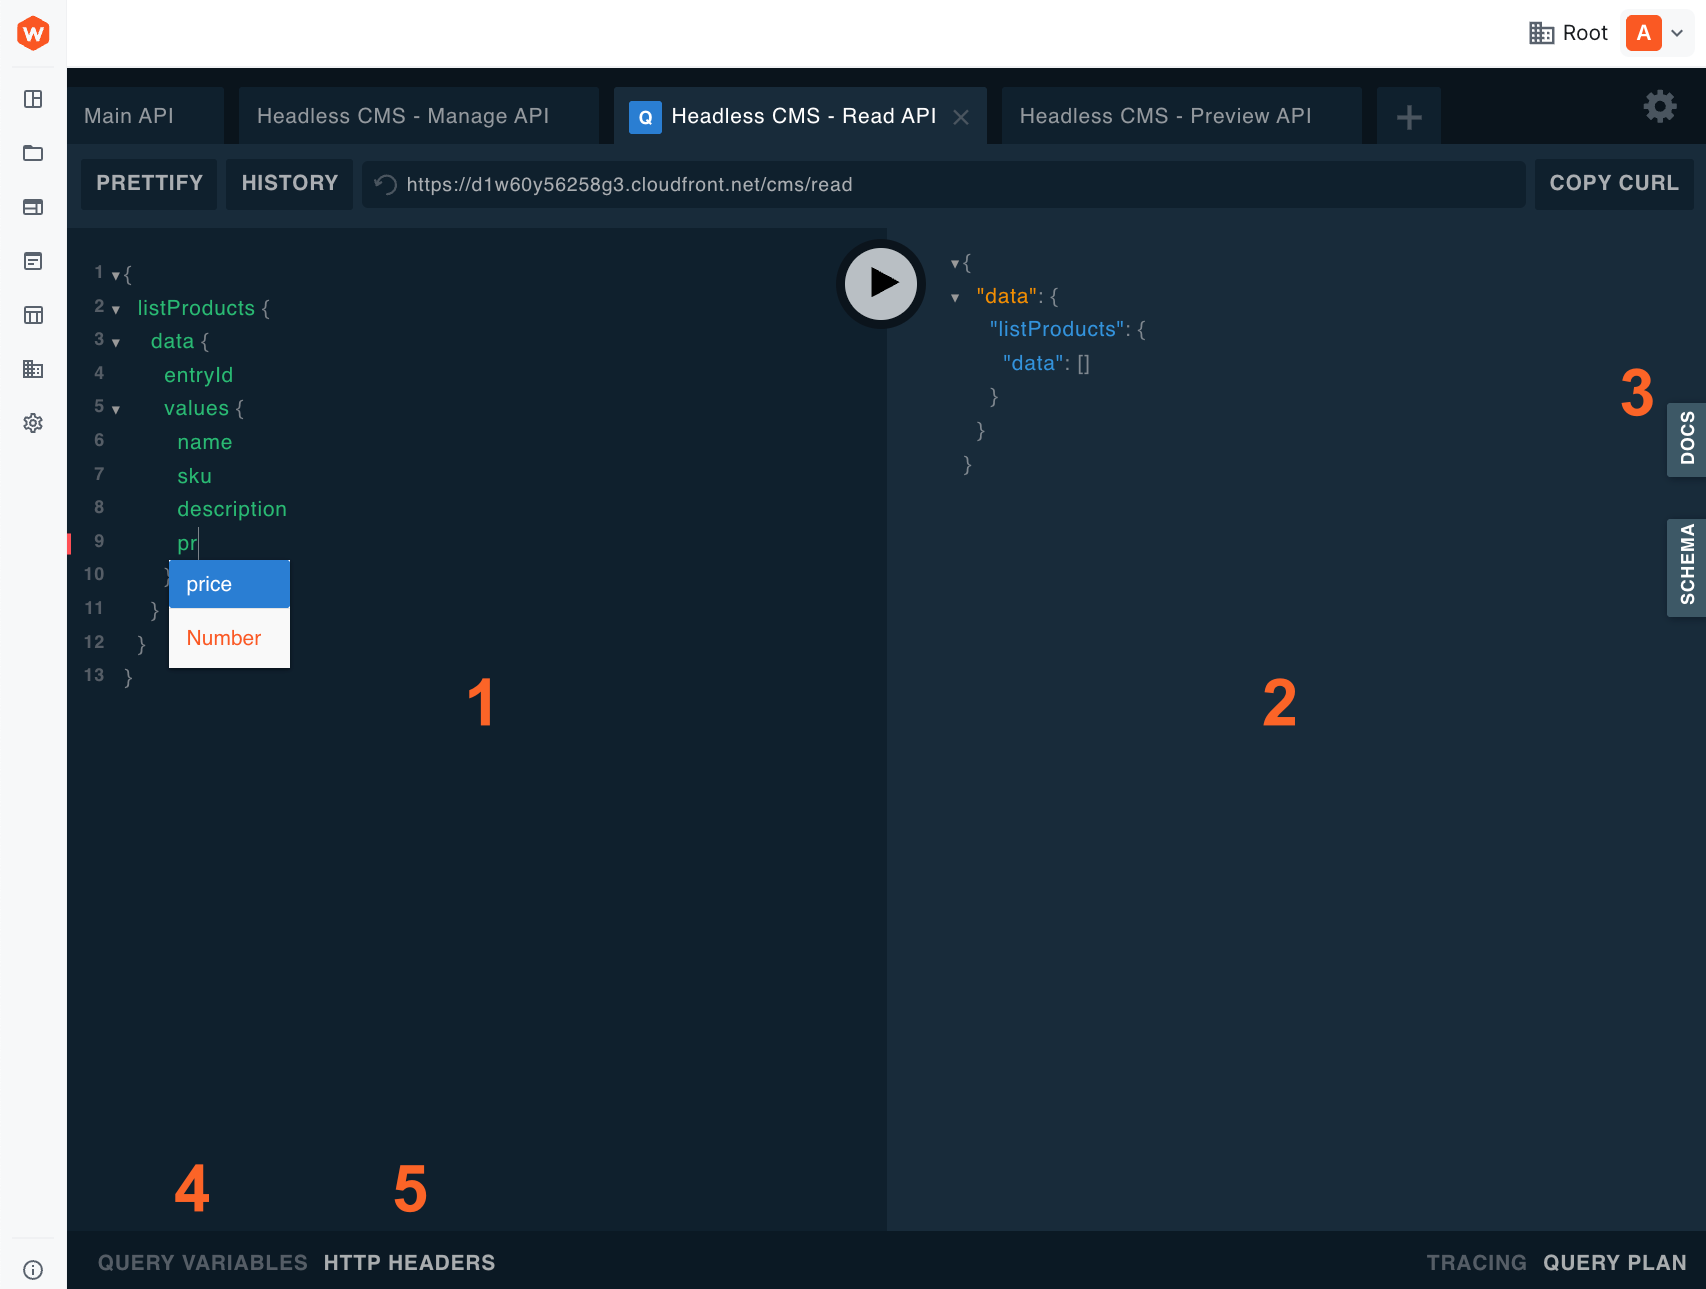
1. Query Editor (Left Panel)
This is where you write your GraphQL queries and mutations. It features:
- Syntax highlighting for GraphQL
- Auto-completion (press Ctrl+Space or Cmd+Space)
- Inline error detection
- Line numbers for easy reference
Note: Your queries and results are not saved persistently. If you refresh the page or navigate away from the API Playground, your work will be lost. Make sure to copy any important queries to a local file if you need to save them.
2. Response Panel (Center Panel)
Displays the results of your queries, including:
- Data returned from the API in JSON format
- Error messages if something goes wrong
- Execution time for performance monitoring
3. Documentation Explorer (DOCS Button)
Click the "DOCS" button on the right side to access:
- All available queries and mutations
- Field types and descriptions
- Required vs optional fields
- Nested type definitions
4. Query Variables Panel (Bottom Left Tab)
Define variables for your queries to make them reusable. Instead of hardcoding values in your queries, you can use variables which makes queries more maintainable and secure.
5. HTTP Headers Panel (Bottom Right Tab)
Configure HTTP headers for your requests. When accessing the API from external applications, you'll use this to add authentication headers with your API key.
When using the API Playground within Webiny Admin, you're automatically authenticated as the currently logged-in user. This means you'll only be able to query content you have permission to access based on your user role and permissions. No need to manually add authentication headers!
Exploring the Schema with Documentation
The API Playground's documentation explorer is incredibly powerful for discovering what's available in your API.
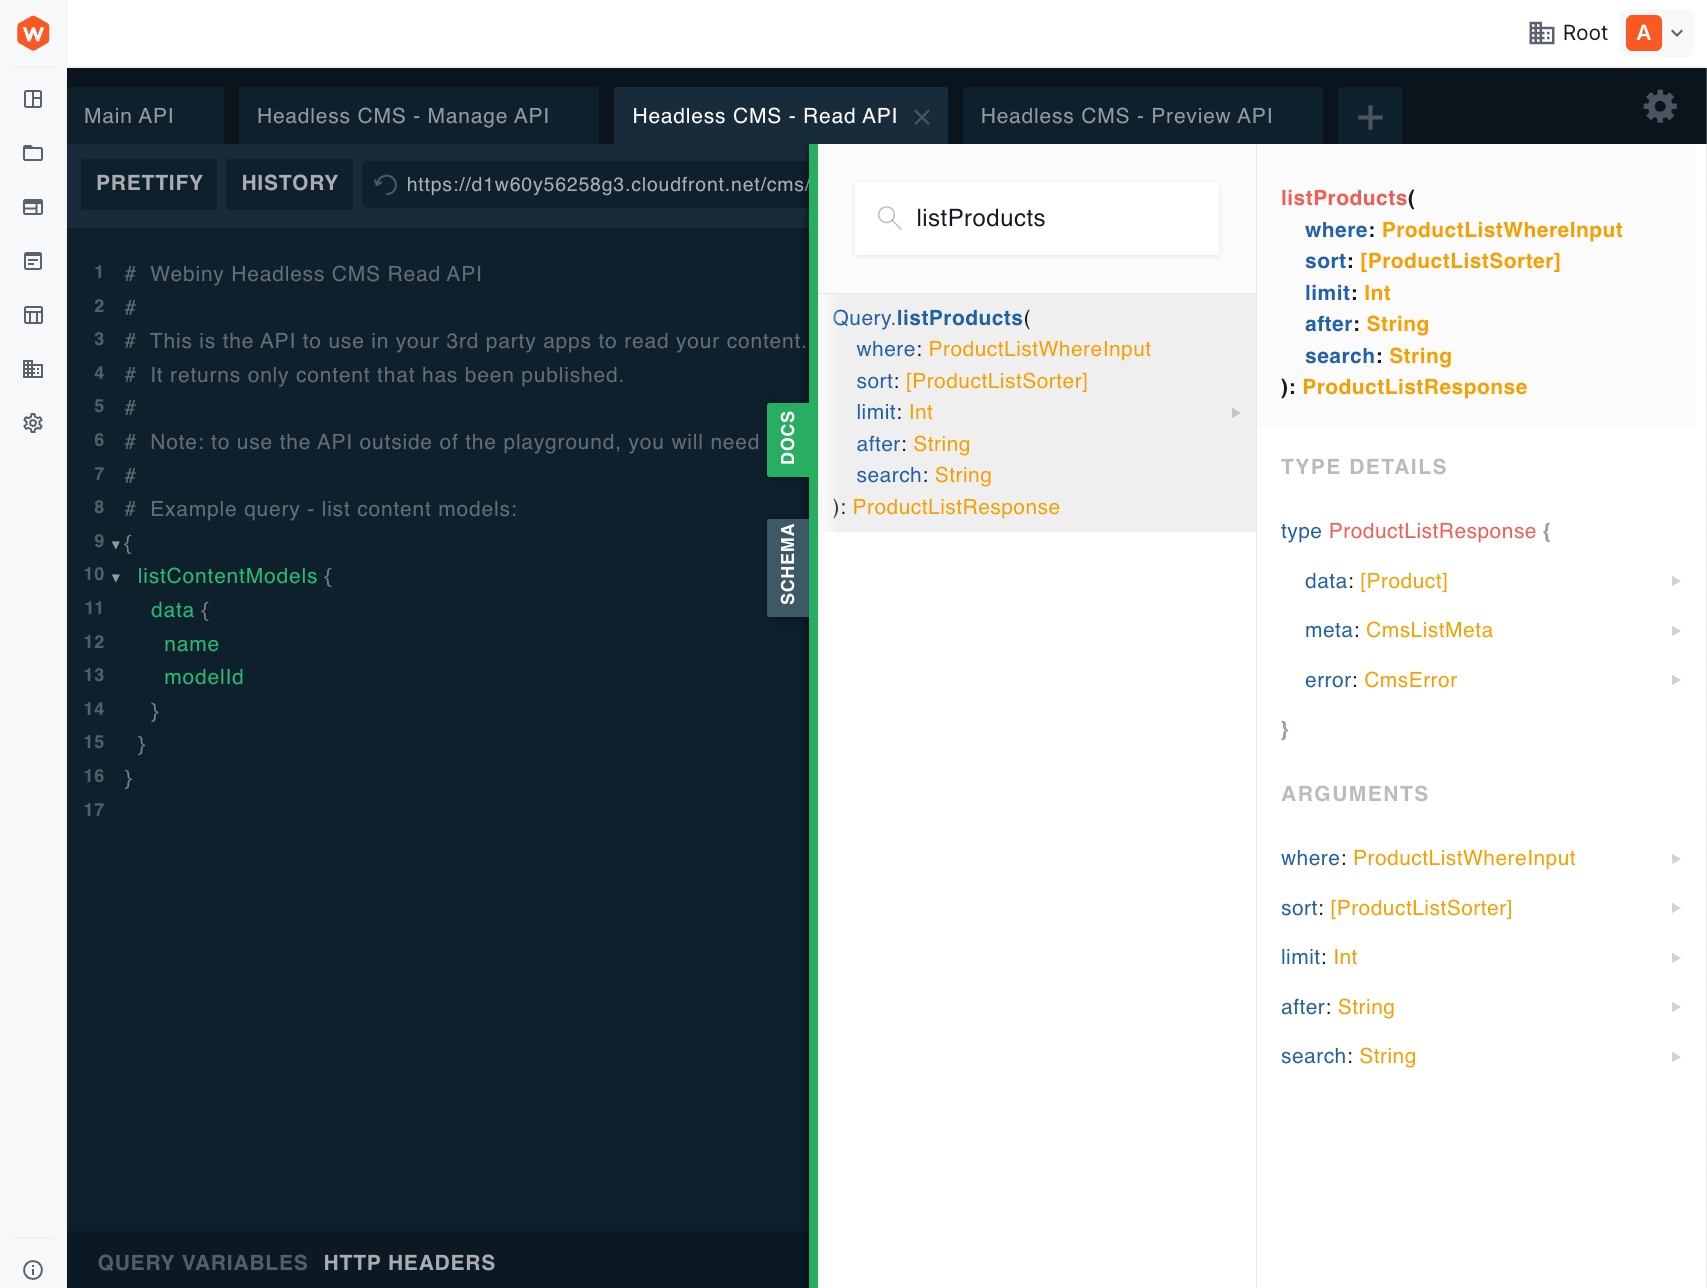
How to Use the Documentation Explorer
- Click the "DOCS" button on the right side of the playground to open the documentation panel
- Browse the root types - You'll see two main labels:
- queries - All available read operations
- mutations - All available write operations (Manage API only)
- Search or browse - Use the search bar to find specific queries (e.g., type "listProducts") or scroll through the list
- Navigate deeper - Click on types and fields to explore nested structures
Example: Exploring the Product Model
Let's explore the Product model structure:
- Open the DOCS panel
- Search for
listProductsin the search bar (or scroll to find it) - Click on
listProductsto see:- Return type:
ProductListResponse - Available arguments (where, sort, limit, after, search)
- Return type:
- Click on
data: [Product]in the ProductListResponse - A new column appears showing all available fields in the Product model
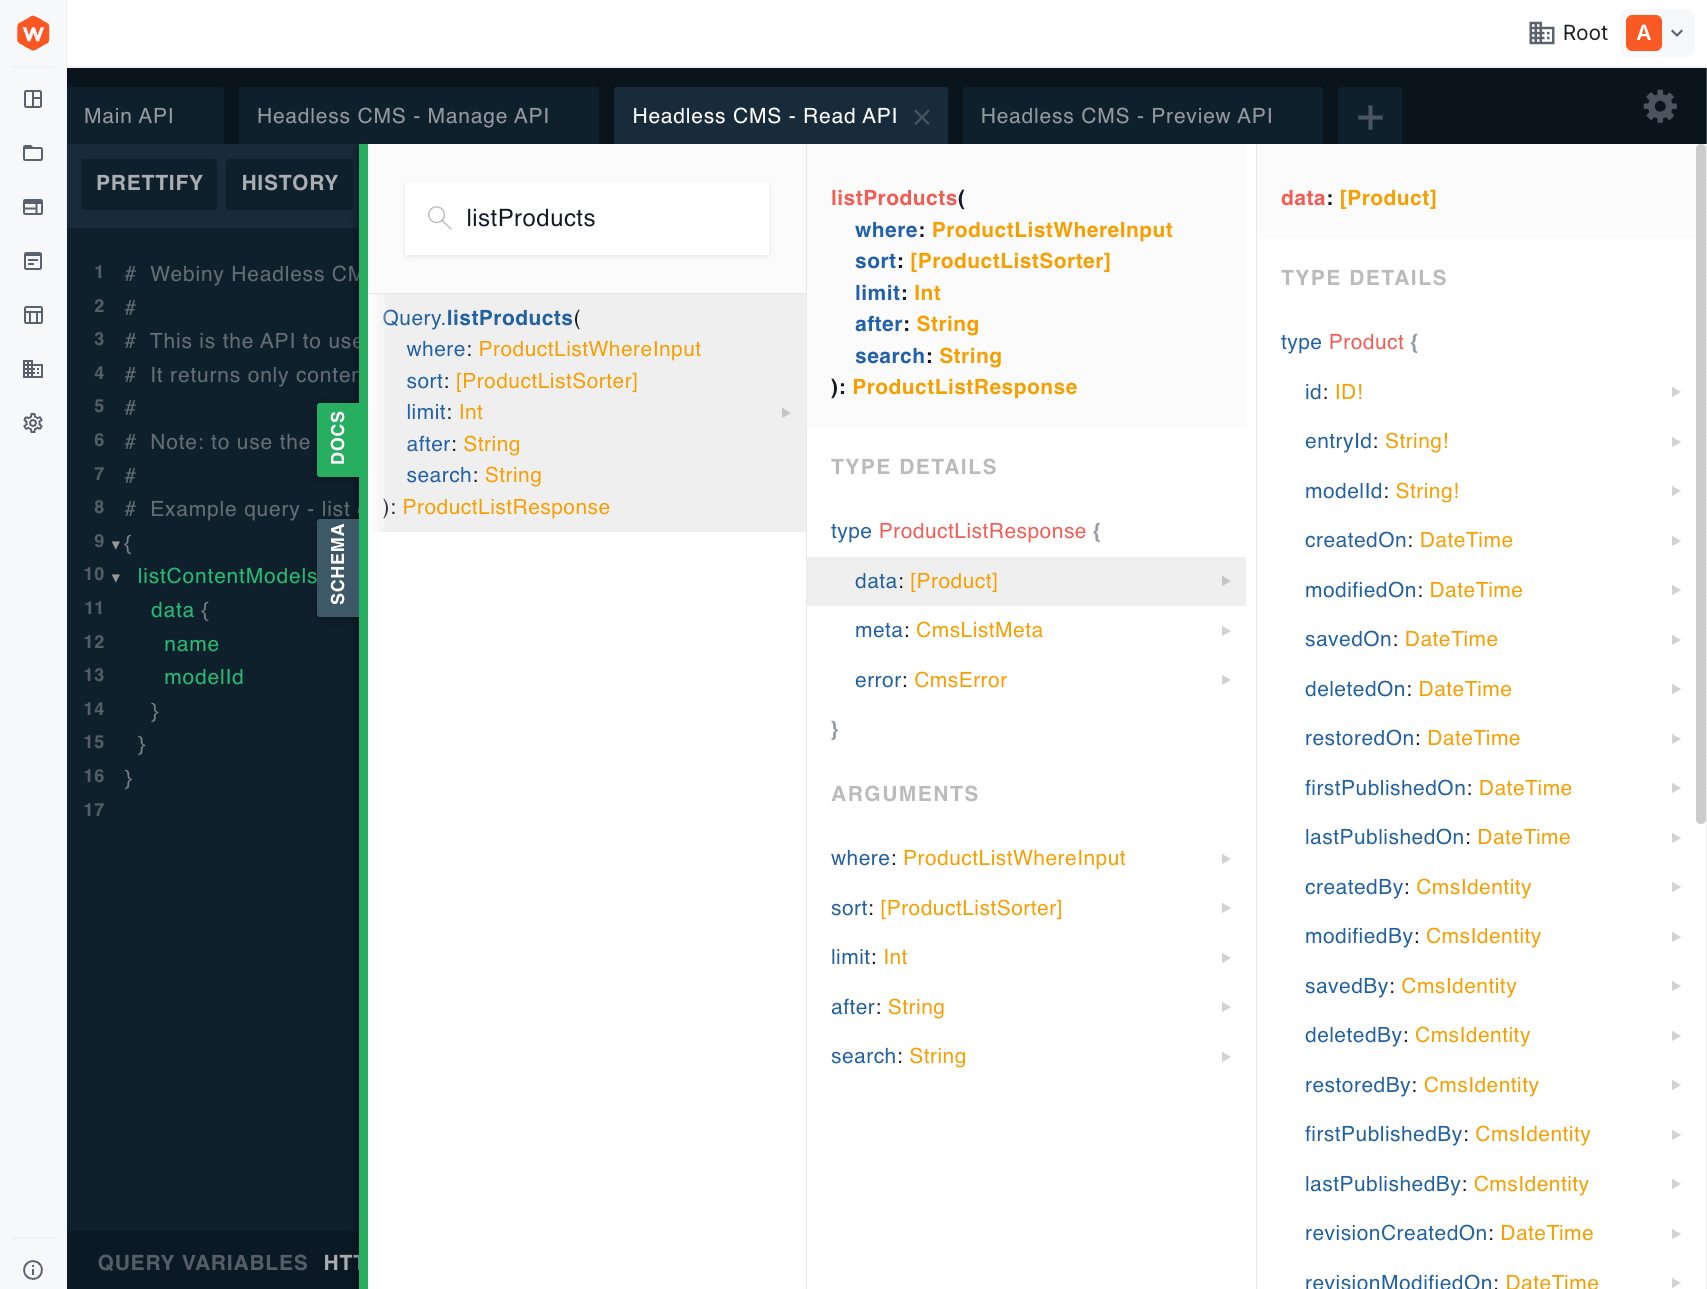
The documentation is auto-generated from your content models. Every time you add or modify a content model, the schema documentation updates automatically!
Switching Between APIs
Simply click the tabs at the top of the API Playground to switch between different APIs:
- Headless CMS - Manage API - Full CRUD operations
- Headless CMS - Read API - Published content queries
- Headless CMS - Preview API - Latest revision queries including drafts
Each API tab provides the same playground interface, but with different capabilities based on the API type you're using.
Best Practices
1. Use Auto-Complete and Documentation
Don't guess what fields are available - use the auto-complete feature (Ctrl+Space or Cmd+Space) while typing, or explore the schema using the DOCS panel to discover all capabilities.
2. Test Queries Before Implementation
It's recommended to test your queries in the playground before implementing them in your application code. This can save debugging time later.
3. Explore All Three API Types
When learning, explore the Manage, Read, and Preview API tabs to understand how each one behaves differently with the same queries.
4. Check Error Responses
Pay attention to error messages in the response panel - they provide valuable information about what went wrong with your query. Additionally, list queries have an error field which shows issues if any occur. It's advised to include this field when performing queries - you'll see this in action in the next lesson.
5. Remember: You're Already Authenticated
The API Playground uses your current login session for authentication. You'll only see content you have permission to access based on your user role.
Summary
In this lesson, you learned:
- ✅ The API Playground is accessed via the Support menu in Webiny Admin
- ✅ It's based on GraphQL Playground for exploring and testing APIs
- ✅ There are tabs for different APIs: Main API, Manage API, Read API, and Preview API
- ✅ Authentication is automatic - you're authenticated as the logged-in user
- ✅ The playground has 5 key areas: Query Editor, Response Panel, Documentation Explorer, Query Variables, and HTTP Headers
- ✅ The Documentation Explorer helps you discover available queries, mutations, and fields
- ✅ You can switch between APIs using tabs to test different API behaviors
- ✅ Always test queries in the playground before implementing them in your app
The API Playground is your best friend when working with Webiny HCMS. Use it frequently to experiment, debug, and understand how your API works!
In the next lesson, you'll learn how to use these APIs from your own applications, including creating API keys and writing queries in your code.
It's time to take a quiz!
Test your knowledge and see what you've just learned.
Next lesson: Reading Records via the API - Learn how to fetch data from the HCMS API in your application code.